This article first appeared as part of Workstate Codes. If you are interested in how Workstate can help you with your custom IAM needs, reach out today.
IdentityServer3views.pngThere are a few situations where a robust authorization solution, such as a hybrid flow with OpenID Connect, might not be the best fit for your application. You may have a requirement that a user is never redirected away from the application. You may need to move a legacy application away from HTTP Basic or Digest authentication. The resource owner password credentials flow provides a way for an application to authorize against, and receive an access token from, an OAuth2 server.
For this walk-through, we will use IdentityServer3. IdentityServer3 has become one of our favorite tools for providing authentication through OpenID Connect and can provide authorization through OAuth2. The IdentityServer team provides a number of tremendous samples, including a handful of applications showing resource owner flow. This guide will build upon those and create a basic ASP.NET MVC 5 web application with login and logout functionality and a secured example page.
Caveats
Before going further, some limitations must be made clear.
- Resource owner flow only works for a trusted app; that is, an application that can be trusted to securely handle user credentials.
- Resource owner flow cannot be used for single sign-on (SSO). Each application should provide its own login page.
- Authorization through OAuth2 should not imply authentication; no identity information is provided in the token response. Some documentation or syntax may be confusing or ambiguous, especially around IdentityModel and OWIN.
That said, resource owner flow is a perfectly valid solution where your requirements align and OAuth2 is sufficient.
Prerequisites
The following software versions were used in the creation of this guide.
- Windows 10 Pro
- Visual Studio Pro 2015 Update 3
- IdentityServer3 2.5.0
- IdentityModel 1.9.2
Identity Server
Create a new Visual Studio solution. Add the Self-Host (Minimal) project from the identityserver3 samples. You will also need to add (and reference) the Constants project available from the client samples.
As we need to run the identity server over a secure connection, we need an SSL certificate on localhost. To create a self-signed certificate with Powershell:
New-SelfSignedCertificate -dnsname "localhost" -certstorelocation "cert:\localmachine\my"
The new certificate will appear in Certificates (Local Computer)\Personal\Certificates. Copy this new certificate into your trusted root certification authorities. Your web browser(s) will no longer complain about an invalid certificate, and we can securely request tokens without modifying Constants.BaseAddress.
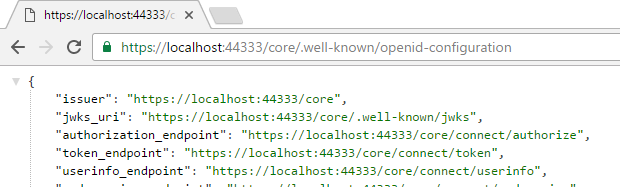
Debug the solution and visit https://localhost:44333/core/.well-known/openid-configuration to view the configuration.
MVC Web Application
Create a new ASP.NET Web Application (4.5.x) and select the MVC template; set authentication to No Authentication. Add a reference to the Constants project. Don’t worry about configuring SSL for now.
Add the following packages via NuGet:
- Microsoft.Owin.Security.Cookies
- Microsoft.Owin.Host.SystemWeb
Create a new class Startup.cs. Before the namespace, insert the following attribute
[assembly: OwinStartup(typeof(MVCResourceOwnerFlow.Startup))]
This attribute instructs the application to execute the Startup configuration with each run.
If you run into an error when loading the application “OwinStartup attribute… conflicts with the attribute in assembly… because they have the same FriendlyName”, you will need to provide a unique OWIN startup name according to Microsoft’s documentation. Make sure you include the matchingappSettings value in your web.config.
Create a Configuration() method in the Startup class. Note the LoginPathproperty; this is the path where users will be redirected when they are not authorized for a specific action.
public class Startup
{
	public void Configuration(IAppBuilder app)
	{
		AntiForgeryConfig.UniqueClaimTypeIdentifier = "http://schemas.xmlsoap.org/ws/2005/05/identity/claims/nameidentifier";
		app.UseCookieAuthentication(new CookieAuthenticationOptions
		{
			LoginPath = new PathString("/account/login"), AuthenticationType = "Cookies"
		});
	}
}
Make copies of Config\Certificate.cs and Config\idsrv3test.pfx from the SelfHost project and change the namespace and the GetManifestResourceStream parameter to match the new locations in the MVC project.
namespace MVCResourceOwnerFlow
{
	internal static class Certificate
	{
		public static X509Certificate2 Get()
		{
			var assembly = typeof(Certificate).Assembly;
			using (var stream = assembly.GetManifestResourceStream("MVCResourceOwnerFlow.idsrv3test.pfx"))
			{
				return new X509Certificate2(ReadStream(stream), "idsrv3test");
			}
		}
Login Page
Create a basic login view model,
namespace MVCResourceOwnerFlow.Models
{
	public class LoginViewModel
	{
		public string Username { get; set; }
		public string Password { get; set; }
	}
}
and a simple login page.
@model MVCResourceOwnerFlow.Models.LoginViewModel
<div class="row">
	<div class="col-md-4">
		<h2>Log In</h2>
	@using (Html.BeginForm("Login", "Account", FormMethod.Post))
	{
		<div class="form-group">
			@Html.LabelFor(m => m.Username)
			@Html.TextBoxFor(m => m.Username, new { @class = "form-control" })
		</div>
		<div class="form-group">
			@Html.LabelFor(m => m.Password)
			@Html.PasswordFor(m => m.Password, new { @class = "form-control" })
		</div>
		@Html.AntiForgeryToken()
		<button type="submit" class="btn btn-primary">Submit</button>
	}
	</div>
</div>
Claims Page
Create a claims view model. This will allow us to view the claims sent with the access token.
using System.Collections.Generic;
namespace MVCResourceOwnerFlow.Models
{
	public class ClaimsViewModel
	{
		public string Header { get; set; }
		public string Message { get; set; }
		public bool IsAuthenticated { get; set; }
		public IEnumerable<KeyValuePair<string, string>> Claims { get; set; }
		public ClaimsViewModel() {}
		public ClaimsViewModel(IEnumerable<KeyValuePair<string, string>> claims)
		{
			Claims = claims;
		}
	}
}
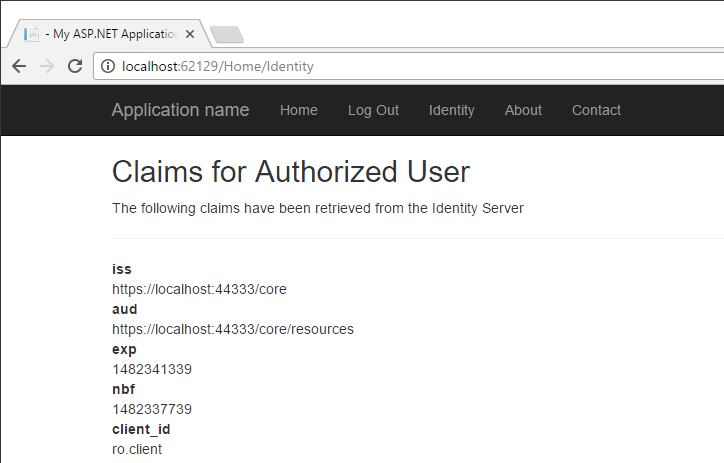
Modify the Home controller to include an Identity action. The [Authorize]attribute secures this action. The user will be redirected to the aforementioned LoginPath if not authorized.
[Authorize]
public ActionResult Identity()
{
	return View(GetClaimsViewModel());
}
private ClaimsViewModel GetClaimsViewModel()
{
	var identity = (ClaimsIdentity) HttpContext.User.Identity;
	return new ClaimsViewModel
	{
		Header = "Claims for Authorized User",
		Message = "The following claims have been retrieved from the Identity Server",
		Claims = identity.Claims.Select(x => new KeyValuePair<string, string>(x.Type, x.Value)),
		IsAuthenticated = HttpContext.User.Identity.IsAuthenticated,
	};
}
Create a simple page to view our claims.
@model MVCResourceOwnerFlow.Models.ClaimsViewModel
<h2>@Model.Header</h2>
<p>@Model.Message</p>
<hr />
<div style="width: 90%; word-wrap: break-word; margin-bottom: 50px;">
@if (Model.IsAuthenticated || Model.Claims != null)
{
	<dl>
	@foreach (var claim in Model.Claims ?? new List<KeyValuePair<string, string>>())
	{
		<dt>@claim.Key</dt>
		<dd>@claim.Value</dd>
	}
	</dl>
}
</div>
Authorization Controller
Now we get to the meat of our solution. Create a new controller.
using System;
using System.Collections.Generic;
using System.IdentityModel.Tokens;
using System.Linq;
using System.Security.Claims;
using System.Threading.Tasks;
using System.Web;
using System.Web.Mvc;
using IdentityModel.Client;
using Microsoft.Owin.Security.Jwt;
using MVCResourceOwnerFlow.Models;
using Sample;
namespace MVCResourceOwnerFlow.Controllers
{
	public class AccountController : Controller
	{
		[HttpGet]
		[AllowAnonymous]
		public ActionResult Login()
		{
			var model = new LoginViewModel();
			return View(model);
		}

		[HttpPost]
		[AllowAnonymous]
		[ValidateAntiForgeryToken]
		public async Task<ActionResult> Login(LoginViewModel model, string returnUrl)
		{
			TokenResponse token = await GetToken(model.Username, model.Password);
			await SignInAsync(token);
			return RedirectToAction("Index", "Home");
		}

		private async Task<TokenResponse> GetToken(string user, string password)
		{
			var client = new TokenClient(Constants.TokenEndpoint, "ro.client", "secret");
			var result = await client.RequestResourceOwnerPasswordAsync(user, password, "read write");
			return result;
		}

		public async Task SignInAsync(TokenResponse token)
		{
			var claims = await ValidateIdentityTokenAsync(token);
			var id = new ClaimsIdentity(claims, "Cookies");
			id.AddClaim(new Claim("access_token", token.AccessToken));
			id.AddClaim(new Claim("expires", DateTime.Now.AddSeconds(token.ExpiresIn).ToLocalTime().ToString()));
			Request.GetOwinContext().Authentication.SignIn(id);
		}

		private async Task<IEnumerable<Claim>> ValidateIdentityTokenAsync(TokenResponse token)
		{
			return await Task.Run<IEnumerable<Claim>>(() =>
				{
					JwtSecurityTokenHandler tokenHandler = new JwtSecurityTokenHandler();
					var cert = Certificate.Get();
					TokenValidationParameters validationParameters = new TokenValidationParameters
						{
							ValidAudience = Constants.BaseAddress + "/resources", ValidIssuer = Constants.BaseAddress,
							NameClaimType = "name",
							IssuerSigningTokens = new X509CertificateSecurityTokenProvider(
								Constants.BaseAddress,
								cert).SecurityTokens
						};

					SecurityToken t;
					ClaimsPrincipal id = tokenHandler.ValidateToken(token.AccessToken, validationParameters, out t);
					var claimList = id.Claims.ToList();
					return claimList.AsEnumerable();
				});
		}

		[HttpGet]
		public ActionResult LogOff()
		{
			Request.GetOwinContext()
				.Authentication
				.SignOut("Cookies");
			return RedirectToAction("Index", "Home");
		}
	}
}
Note that GetToken() uses the sample resource owner client (“ro.client”). Compared to the sample console client, we perform certificate validation; ValidateIdentityTokenAsync() validates the token and returns a set of Claims that can be consumed by the Request.GetOwinContext().Authentication object.
Finally, modify the layout view to include links for our new actions.
<li>@Html.ActionLink("Home", "Index", "Home")</li>
@if (Request.IsAuthenticated)
{
    <li>@Html.ActionLink("Log Out", "Logoff", "Account")</li>
}
else
{
    <li>@Html.ActionLink("Log In", "Login", "Account")</li>
}
<li>@Html.ActionLink("Identity", "Identity", "Home")</li>
<li>@Html.ActionLink("About", "About", "Home")</li>
<li>@Html.ActionLink("Contact", "Contact", "Home")</li>
Run the Application
Walk through the login, identity and logout actions. Note when not logged in, if the user visits the claims (Identity) page, they are redirected to login.
What’s Next?
Now that the MVC application has a valid access token, we can make calls to a secured API resource. A good one to start with would be the IdentityServer3 sample API.